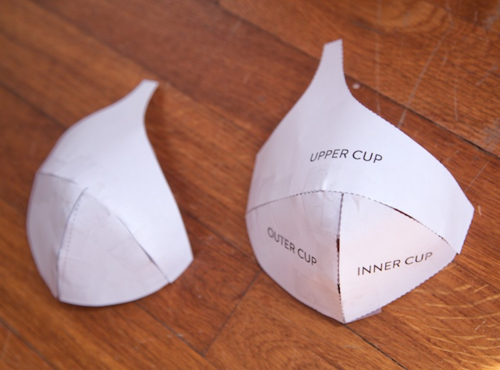
If it’s not in multiple pieces, it’s not going to curve well and that might be the cause of your issue. You can either match the bra cups by making a copy of the bra, or you could add more darts to fix the folds, or if it is a stretch fabric you can pull it so it stretches over a base like foam or worbla.
HEY WRITERS OF ALL KINDS AND AGES AND MAYBE EVEN DNDERS OR TABLETOP GAMERS ARE YOU READY FOR SOMETHING SUPER RAD? I HOPE SO ‘CAUSE
RANDOM
MAP
GENERATOR
WITH
EDITING FEATURES AVAILABLE
IT DOESN’T REALLY DO LAND MASSES OR ANYTHING BUT IT SURE AS HELL WILL MAP THAT CITY/VILLAGE/SHIP/DUNGEON/WHATEVER THAT YOU’VE BEEN MEANING TO MAP OUT FOR YOU
yo here’s a useful tip from your fellow art ho cynellis… use google sketchup to create a model of the room/building/town you’re trying to draw… then take a screenshot & use it as a reference! It’s simple & fun!
Sketchup is incredibly helpful. I can’t recommend it enough.
There’s a 3D model warehouse where you can download all kinds of stuff so you don’t have to build everything from scratch.
A friend asked recently: how do I start animating? So here I have a quick example of happy running squirrel.
Start simple, I recommend, that is, to simplify your animation so you don’t get caught up in the details in the beginning. I observe there are two basic ways you can make a rough animation – by Contour and Structural animations.
Animating is basically to draw a lot and link these drawings together. Some of us draw naturally with contours, the best way for them to begin animating is perhaps simply by animating the contour! So here we link all the drawings by animating the outline and silhouette that are represented by curves, straight lines, and angles.
Some other of us draw more comfortably with the structures, because that how most of us are taught to understand forms in school. With balls and springs, it’s maybe easier for them to understand what’s happening underneath the moving body, and what drive different parts to move differently.
Personally, I’ve always animated with contours because that’s how I draw naturally. Since it’s convenient for me, I could then focus on delivering a more dynamic action. But there are occasions where the character design is based
heavily on forms which requires me to animate structurally.
So you could consider trying either of these two by first understand how you draw – do you draw better by jumping straight to the outlines, or by first representing the body with a skeleton. Contour and structure are like the two ends of a spectrum, once you master one method, you could try the other way to improve your animation! I believe good animations are based on the knowledge of both.
I hope this helps!
Extended ref: I made a contour animation of a squirrel using the sine curve, and you can see how linking the curves could help to bring out the flow. (x)


WITH


